
This post, attaching a Virtual Tape Library (VTL) to a Windows server, is the third in the series in regards to integrating Veeam with an AWS tape gateway. Here are links to the previous posts:
As just mentioned, to this point we’ve deployed an AWS Tape Gateway into our VMware environment and have created tapes. In this post, we’ll look at the steps involved in attaching the VTL to a Windows server in order to add the VTL into our Veeam backup infrastructure.
Windows connects to the VTL using iSCSI and you can connect to the tape gateway using either a host name or an IP address. Personally, I added an (A) record for aws-vtl.nwnlab.ad to my internal DNS in order to resolve the tape gateway using an FQDN.
Connect to the AWS VTL Using iSCSI
- On the Windows host that will attach to the VTL, launch a command prompt and execute the command iscsicpl.exe. When prompted to start the iSCSI service, click Yes.

- In the iSCSI Initiator Propertieswindow, click the Discoverytab, and then click Discover Portal.

- On the Discover Target Portal window, enter the FQDN/IP of the VTL and click OK.

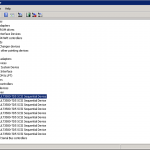
- With the portal entered, click the Targets tab. In the Discovered targets section, you should see 10 tape drives and one media changer. Select each discovered “Inactive” target and click Connect.

- On the Connect To Target window, click OK.
- Repeat steps #4-5 to connect to all targets.

- Open Device Manager and expand Tape drives. Right-click a tape drive, select Properties. Click the Driver tab and then verify that the Driver Provider is Microsoft.
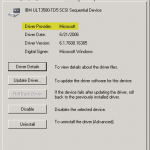
If the Driver Provider is not Microsoft, perform the following steps:
- On the Driver tab, click Update Driver
- On the Update Driver Software screen, select Browse my computer for driver software
- On the Browse for Driver screen, select Let me pick from a list of device drivers on my computer
- On the Select driver screen, select LTO Tape drive and click Next
- When the installation of the driver completes, click Close and then verify that the Driver Provider is now set to Microsoft.
Update the Media Changer Driver
- While still in Device Manager, expand Medium Changer devices.
- Right-click the Unknown Medium Changer, and select Update Driver Software.

- On the How do you want to search for driver software screen, select Browse my computer for driver software.
- On the Browse for Driver screen, select Let me pick from a list of device drivers on my computer.
- In the Select the device driver you want to install for this hardware section, clear the Show compatible hardware check box, select Sony in the Manufacturer list, then select Sony – TSL-A500C Autoloader in the Model list, and then click Next.

- In the warning box that appears, choose Yes. Assuming the driver is successfully installs, close the Update drive software window. The VTL is now ready to be added to the Veeam backup infrastructure.

On the next post, we’ll look at connecting the VTL to Veeam.
I have noticed you don’t monetize your website, don’t waste your traffic, you can earn extra cash every month.
You can use the best adsense alternative for any type
of website (they approve all websites), for more
details simply search in gooogle: boorfe’s tips monetize your website