
Years ago, when I started working with Citrix MetaFrame 1.8, I don’t recall ANY conversations centered around user profile/settings management. Through the haze of memory, it seems like the biggest factor affecting end-user satisfaction was ensuring the appropriate mailbox was accessed when Outlook was launched from the MetaFrame server. Then as things progressed toward shared hosted and virtual desktops, maintaining user settings, even allowing a personalized background, became more and more important. I was told by one customer that “not being allowed to change my background stifles my creativity” and so I began to care about user profile and personal settings when deploying Citrix and later on, VMware virtual desktop/apps solutions.
Fast forwarding to today, we no longer have user profile tools, but user or workspace (no pun necessarily intended) environment management tools because we need to do more than just save user settings (though that is still important). Sure, users still want to be able to change their backgrounds or add custom shortcuts but IT administrators, rightfully so, want to ensure their environment is secure. Is this even possible? Can an organization provide end-users a workspace that is both customizable AND secure? With Liquidware ProfileUnity, of course you can! ProfileUnity provides an administrator with a plethora of configuration options that allow an organization to provide workspace security consistent with, or better than, their existing best practices while also enhancing the overall user experience thus elevating user creativity to levels never before seen or even considered.
Why Use ProfileUnity for AWS WorkSpaces
You might be thinking to yourself, “Aren’t AWS WorkSpaces basically persistent virtual desktops? Why would I need or want a workspace management tool?” And I would say to you that your question is a good one. Let me start by presenting to you the ProfileUnity benefits found on the Liquidware Amazon WorkSpaces page because I’m certain I couldn’t phrase it any better but I’ll add some personal thoughts:
- Centralized management of user environments
- In this post I’ll detail the steps required to use AWS S3 buckets as the central repository for configuration and user data, but you could certainly use Azure and Google Cloud storage as well as Windows shares that exist on cloud or on-prem machines.
- Migration options to AWS from legacy PCs or VDI
- You could also turn this around in that after piloting WorkSpaces, an organization may decide against a full-scale implementation. ProfileUnity provides that organization the means by which to migrate configuration and user data from AWS WorkSpaces to the physical or VDI environment of their choice.
- Easy to configure and manage environment settings per user, group, or by context
- Security features such as per user/group desktop rights (lockdown), application-rights management and privilege elevation
- Manage user profiles beyond basic profile solutions
- The preceding bullet points are simply pointing out that though ProfileUnity is east to configure, it is feature rich, flexible, and highly customizable.
- Cross Windows OS compatibility of user profiles.
- This is what originally hooked me on ProfileUnity and I’ll touch on in briefly in this post.
Creating Amazon S3 Buckets and Policies to Support ProfileUnity
Before we get started with this section, I recommend that you download and review the Liquidware document Using Cloud Storage with ProfileUnity. I simply want to give credit where credit is due and not give the impression that I came up with these steps all by myself as this document served as an effective guide walking me through the process.
- Login to the AWS Management Console. Under the Storage heading, click S3 and then click Create Bucket.
- On the Name and Region screen, specify a Bucket name in alignment with AWS and your own organizations naming practices, select the Region in which the bucket will reside, and then click Next. In regards to the region, the Liquidware doc suggests that one “choose a region location that is in close proximity to reduce latency and costs, or to meet regulatory requirements.” In my case, I selected the US East (N. Virginia) region for the S3 bucket because my WorkSpaces connect to subnets in this region.

- On the Set properties screen, click Next as no property changes are required to support ProfileUnity.
- On the Manage users screen, ensure the default owner has full read and write access, set the permissions shown below, and click Next to continue.
- Manage public permissions – Do not grant public read access to this bucket
- Manage system permissions – Do not grant Amazon S3 Log Delivery group write access to this bucket

- On the Review screen, check the configured settings to ensure they are appropriate for ProfileUnity and click Create bucket.
- With the virtualbonzo-profileunity-useast bucket created, click Create folder to create the subbuckets necessary to hold your data objects. I created (3) subbuckets: configurations, flexapp, and portability as shown below:

Granting the ProfileUnity Management Console and Client Access to Amazon S3
With the creation of the S3 bucket and folder hierarchy, we must now give the ProfileUnity management console and client access to the S3 bucket. Ideally, you will do this without using root or AWS admin permissions thus we will create two new IAM accounts for ProfileUnity. One account will be used by the ProfileUnity management console and the other will be used by the ProfileUnity client. Two ProfileUnity accounts allow for customized permissions per use case and separates management console and client activities in order to more easily audit those activities.
- To create the ProfileUnity Management Console account, click IAM under the Security, Identity, and Compliance heading on the AWS management console dashboard.
- On the Set user details page, enter a descriptive User name and for Access type, select Programmatic access. Click Next: Permissions

- On the Set permissions page, click Attach existing policies directly | Create policy

- On the Create policy page, click the JSON tab. Copy the JSON code from http://download.liquidwarelabs.com/ProfileUnity.NET/AWS-ProfileUnityConsole-UserPolicyv1.0.txt and paste it into the JSON policy tab. NOTE: Always copy the JSON code as listed in the Liquidware documentation. Though the link above was vaild as of October 2018, never assume the above link is where the latest JSON code is found.
- With the JSON code in the policy editor, edit lines 15, 24, and 33 to match the name of the ProfileUnity bucket you created earlier. Basically where you see co-profileunity-region, replace it with your bucket name and click Review policy.

- On the Review policy page, give the policy a Name and click Create policy.

- When you clicked Create policy on step #4, a separate browser tab should have opened. With the policy created, return to the browser tab on which you were creating the IAM user and click the Refresh button to update the policy list.

- On the Set permissions page, search for and then select the ProfileUnity Console policy and click Next: Review.

- On the Review page, ensure the user information is correct and click Create user.
- Once the ProfileUnity management console user is created, document the Access key ID and Secret access key. Keep this information in a safe place.

- To create the ProfileUnity Client account, you basically repeat steps #1-10 above:
- Create a new user such as VBonzo-PU-Client
- Create a new policy using the JSON code from http://download.liquidwarelabs.com/ProfileUnity.NET/AWS-ProfileUnity-Client-UserPolicyv1.0.txt
- Remember, always check the Liquidware documentation for the latest JSON code…don’t assume this link is correct!
- Edit the lines referencing S3 buckets and match them to the S3 bucket created for ProfileUnity
- Apply the policy and create the user
- Document the Access Key ID and the Secure Access Key and store them in a safe place.
Setup the Cloud Storage Template in ProfileUnity
With the required AWS S3 buckets and IAM user accounts created, launch the ProfileUnity Management Console and use the AWS S3 storage template in order to store user workspace settings in the Amazon cloud. The steps below will display the steps to configure AWS S3 storage using the Guided Configuration Wizard.
- Open the ProfileUnity Management Console and click Configuration Management | Create

- When prompted to choose a Guided or Manual deployment mode, select Guided
- On the Select Template for Configuration screen, select Windows 7, 2008R2, 10 or 2016 Profiles Stored on AWS S3 and click Next.

- On the Assign Cloud Storage Credentials screen, click Add Cloud Credentials

- When prompted, enter both the Cloud Console and Cloud Client credentials, clicking Save after each.
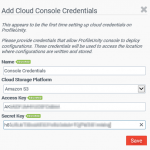
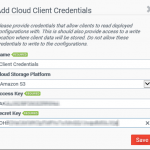
- When the cloud credentials have been entered, specify your AWS S3 bucket name under the Configuration Cloud Storage and Client Cloud Storage paths, then click Validate Cloud Credentials.

- It may take several minutes, but when the cloud credentials have been validated, click Close to continue the guided configuration wizard.

- On the Assign Values to Variables screen, specify the path in which user profiles/settings will be saved and click Next. Typically, the user data is stored in the portability folder of the S3 bucket. An example path is S3://YourAWSBucket/portability/%username%

- On the Active Directory GPOs and License Group screen, under the Automatic GPO Integration heading, select that contains (or will contain) AWS WorkSpace computer objects as well as the AD security group to which the ProfileUnity configuration should apply. In my lab domain, I created a Windows security group called ProfileUnityUsers and as its members, I added domain user accounts to whom I created an AWS WorkSpace. To allow the ProfileUnity client to install on AWS WorkSpace machines and allow basic user settings to be saved, click Run GPO Integration. When that process completes, click Next.

- On the Confirm Your Settings screen, specify the Configuration Cloud Storage Path (S3://your AWS S3 bucket name/configurations) in which to save the ProfileUnity configuration file and click Deploy. When the deployment is successful, click Finish.

Testing Success by Connecting to an AWS WorkSpace
Assuming your AWS WorkSpace(s) computer object(s) have been created in the appropriate OU AND your AD user account is a member of the ProfileUnityUsers security group, you should see ProfileUnity run during login.

And, when you log off, you should see a bunch of files created within your S3 bucket which is a good indicator that your settings are being saved at logoff.

To perform a basic test, while connected to my Windows 10 WorkSpace I created a few bookmarks in Google Chrome. I then deleted my Windows 10 WorkSpace and created a new Windows 7 WorkSpace which does not include Google Chrome, I don’t believe any of the built-in AWS WorkSpace bundles/images do. By as soon as I loaded Google Chrome on my Windows 7 WorkSpace, the bookmarks I created on the Windows 10 WorkSpace reappeared.


As I said earlier in this post, cross Windows OS compatibility for user profiles is one of my favorite ProfileUnity features.
Conclusion
I know this was a long post but thanks for sticking with it but I hope that in some measure, you’ll see the power and flexibility of ProfileUnity. Keep in mind that ProfileUnity is not a WorkSpaces tool, I’ve just chosen an AWS WorkSpace model for this blog series. Rest assured, ProfileUnity can be used with VDI infrastructures such as VMware Horizon and Citrix Xen…I mean, Citrix Virtual Apps or Desktops. Additionally, ProfileUnity can be used to manage user settings/profiles for physical workstation environments. What I’ve shown in this post is but a drop in the hat in relation to ProfileUnity’s full capabilities so I encourage you to try it out for yourself and let us know how it goes. We always love hearing from our readers!
On the next post, I’ll share a little about using Liquidware FlexApp (application layering) as an application delivery mechanism for AWS WorkSpaces.