
Overview
Earlier this month, AWS announced that the Amazon WorkSpaces API could now be used to modify the appearance of the WorkSpaces client to enhance the end user experience. The updated API allows you to add a logo, login message, forgot password, and support links unique to your organization.
What aspects of the WorkSpaces client can be customized?
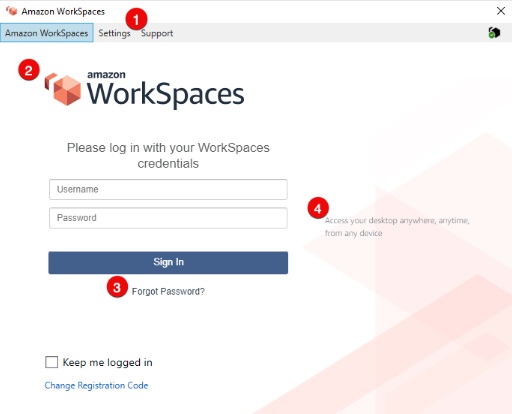
Shown below is a screenshot taken from the WorkSpaces Admin Guide detailing the client settings that can be customized:
- (1) Support Link: Allows you to specify an email or web address for users needing support with their WorkSpaces.
- (2) Logo: Allows you to specify a custom logo appropriate to your organization
- (3) Forgot Password Link: Allows you to specify a web address which enables users to reset their password
- (4) Login Message: Allows you to customize the login message
Customizing the WorkSpaces Client using Python
The Amazon WorkSpaces API now includes the import_client_branding method which enables the client modifications mentioned above. You will find the Boto3 Reference Documentation helpful for detailed information regarding the import_client_branding method, but if you’re looking for an easy example of the code required to customize the WorkSpaces client, you’re in the right place.
If you look at the Boto3 reference doc, you’ll see that you can customize the client settings for Windows, OSx, Android, IOS, Linux, and the Web. You can choose to customize the settings for each of these clients, or for a portion of them, its up to you.
For this post, I’m going to share the very simple Python code I wrote to customize the WorkSpaces client of Windows-based devices for a specific directory/registration code. I submit this to you for example purposes, as a means to see what a Python script could look like. Granted, I did test this exact code myself, but there could be a better way to accomplish the task. Though I think the Boto3 reference doc provides decent code examples but sometimes it can be a challenge for me to figure out the exact syntax needed. In this case, I needed some help with the ‘Logo’ syntax and was fortunate to get it from a fantastic co-worker in pretty short order.
Seeing that I will likely work with multiple WorkSpaces directories, I decided to have the script prompt me for the WorkSpaces Directory ID and use that as the variable for the ResourceId parameter. In regards to the ‘Logo’ option, be sure to change the path and filename for your own logo….it MUST be a PNG! I found it easier to copy the logo to my local workstation and specify it using the ‘with open’ syntax but this may be an opportunity for your Python skills to shine and optimize what I have provided here. I was concerned about the local path at first but what happens is that when the script successfully completes, the file is copied to a CloudFront distribution managed by AWS and saved as “workspaces-branded-logo-<devicetype>.png
import boto3
from colorama import Fore, Back, Style

## The code below asks for the WorkSpaces Directory ID of the clients you wish to customize

input_flag = True
while input_flag:
    adc_id = input("Enter the WorkSpaces Directory ID on which to apply the customizations: ")
    if not adc_id:
        print(Fore.RED + "The ID cannot be blank! Try again!")
        print(Style.RESET_ALL)
        continue
    else:
        input_flag = False

## The code below performs the WorkSpaces client modifications

with open('c:\Temp\TestLogo3.png','r+b') as img_branding:
    file_img_branding = img_branding.read()
    bytes_img_branding = bytearray(file_img_branding)

service = boto3.client('workspaces')
response = service.import_client_branding(
    ResourceId=str(adc_id),
    DeviceTypeWindows={
        'Logo': bytes_img_branding,
        'SupportLink': 'https://virtualbonzo.com/contact',
        'LoginMessage': {
            'en_US' : 'If you have any issues logging into your Workspace, click the Support tab'
        }
    }
)

print(response)
Executing the Script
Let’s assume I saved my Python script as CustomizeWorkSpacesBranding.py on my Windows-based laptop. To execute this script:
- Launch the command prompt and enter: py CustomizeWorkSpacesBranding.py
- As the code exists above, you will be prompted to enter the WorkSpaces Directory ID on which to apply the customizations. Enter the Directory ID and press <Enter>
- Assuming you leave the print(response) line in the code and the code completes successfully, you will see information similar to the following. Notice the LogoUrl has a cloudfront.net path…

Testing the Customizations
To test the customizations, simply open the Amazon WorkSpaces Client and login to a WorkSpace within the specified Directory. Do you see your customizations?
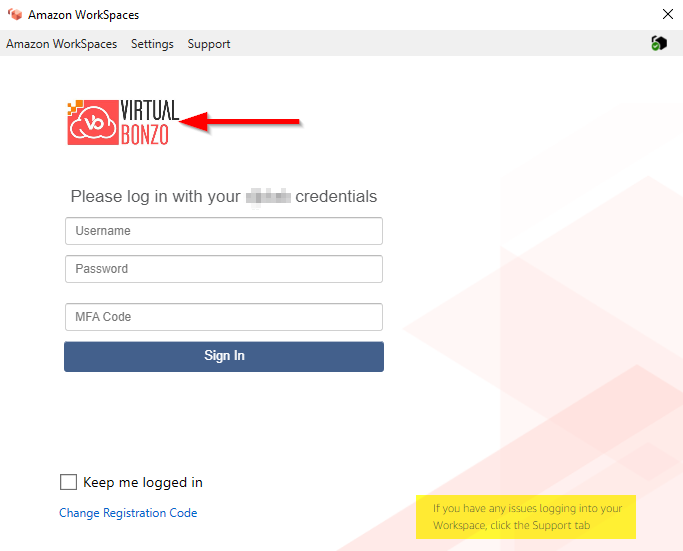
On the WorkSpaces client, click Support | Send Feedback and ensure the Support Link opens as expected. Congratulations, you’ve enhanced the user experience by customizing your WorkSpaces client!
Some Final Thoughts
I like using AWS CloudShell for this kind of task, but in this case, it appears AWS has not updated CloudShell to support the new API method. When running the script from PowerShell, I got an attribute error which stated that “WorkSpaces has no attribute import_client_branding”. I didn’t mess with manual upgrades and switched to my Windows laptop….

Also, I had no luck getting the “ForgotPasswordLink” option to work. When it was included in the script, I received no errors, I just never saw a “Forgot Password?” link on my WorkSpaces client. I thought it may be because my WorkSpaces Directory had MFA enabled. To that end, I tested the ForgotPasswordLink on a non-MFA enabled Directory and the Forgot Password link did not appear on it either. If I figure it out, I’ll update you but if you know what I may be doing wrong, please leave a comment below.
Helpful Links
Here are some links you may find helpful as you work on customizing your WorkSpaces client(s):